Just a Little Canning Information
To Help you out!
How Long Will Your Canned Foods Lasts?:
How do you determine how long a can of food will last? Actually, it’s kind of hard to guess, but here are a few guidelines when trying to determine the shelf life of your canned foods.
Home-Canned Foods: Most sources say that home-canned foods will store safely for a least one year. Two years is still fine for most home-canned foods. With other food items, the level of acid in the food is the critical element for determining how long it may store. Low-acid foods last longer on your shelves than foods with higher amounts of acid. Some sources say all commercially canned food should last at least two years. Here are some specific recommendations:
Low-Acidic Foods: Surprising to some, canned meats can last the longest. Most sources say they will keep or 2 to 5 years. Some sources say they will last even longer. I found a shocking story about a can of meat that was 118 years old. It was opened, analyzed, and found to still have most of the nutrients. It was still good after more than 100 years! You may not choose to eat canned meats that are this old, but likely yours will last more than the recommended five years. Other low-acid foods are soups without tomatoes, carrots, potatoes, pumpkin, and peas.
High-Acidic Foods: For best quality, use high-acidic foods within one year or so. Foods in this category are tomatoes, fruit, and foods with a lot of vinegar in them. Still, many of these canned foods will still be edible after year’s worth of storage, even if they are not at the peak of quality and nutrition.
So what does it mean when we learn that something will last “at least two years?” How long will it last after the two years is over? Again, this depends on who you ask. Some people will say that they should discard the cans at this point, but most will tell you that canned foods can last for a lot longer, even years and years longer. You’ll just have to use your own discretion and inspect your cans carefully before eating the food inside.
Five Food Storage Safety Tips:
It is important to remember to store your food storage safely. The way that you store your food will affect the shelf life of the food. It can also affect the safety of the food itself. Here are five things to consider when storing your food.
1: You should only store your food in containers that have been specifically designed to store food. The containers for food are made from a higher-grade plastic and will help to prevent chemicals leaking into your food. You can purchase these containers at most food storage stores.
2: You need to store your food in a cool place. Many people mistakenly store their food in their garage. Garages are generally not climate controlled, and the temperatures may become very hot in the summer. This will shorten the life of your food storage. A basement or pantry is a better choice
3: You should make sure that you store your food in a dry environment. This is especially important if your are storing cans. This will keep the cans from rusting, which will keep your food safe. You should store your food off of the ground because this will help protect your food storage if you do have a flood in your home.
4: It is important to store your cans safely. Before you use your food you will need to check your cans for dents along the seams. You should also discard any cans that are bulging. If you canned items yourself you need to make sure that the seal held well.
5: Be sure to have a system that tracks the food you are storing. Do not eat foods that are past their expiration date. You do not want to risk becoming seriously ill, because you do not want to waste the food.
What Do The Dates On Your Canned Foods Mean?:
Are you unsure about how long a can of tuna will last? What do the stamps printed on the cans mean? Can the stamped dates tell you how long an item will store? Those codes sure can be confusing! Here are some things to keep in mind when storing canned foods:
First, you may be able to get some information from the product codes printed on the cans, but not much. Cans that list a “use by” date or a “best if eaten by” mean more than random numbers or dates without labels. Other codes or dates printed on cans are not even for customers, they are only labels for the food producers themselves. Here are some common dates printed on cans and other packaged foods and what they mean:
Use-by: Pay close attention if a can has a use-by or expiration date. Canned foods very rarely have use-by or expiration dates. Baby products, like formula and canned baby food are some of the few items with these labels. These and other specific foods with expiration dates are very important and should be followed accurately.
Sell-by: Make sure to purchase canned foods before the sell-by date. But there is not common consensus for how long food will store on your shelf after this date. This varies between different types of foods, storage conditions, and maybe some luck. The general guideline of two years applies to foods with sell-by dates that have past.
Best-if-used-by dates: These dates are placed on products as a prediction of how long the item will last in peak condition, or with the best flavor or optimum nutrition. This date is not a sell-by-date or an expiration date. Canned foods can last years past this date, even though they may technically not be at the peak of quality.
Other dates: Dates that are coded or not given an explanation are most likely printed only for the manufacturer, often as a label code of the day it was canned. These dates are sometimes coded so that the average consumer cannot decipher them.
Perhaps you read this article hoping to get some exact answers about how long to store your canned foods. And, maybe now after reading it you still feel confused. Well, that’s because there are no specific answers for how long canned foods will store. It is really a guessing game when trying to determine how long they will remain good. There is no way to tell for sure how long something will last.
Just follow the Food Safe Guidelines and you will be fine.
How to Read the Codes on Your Canned Foods:
Now if you’re wondering just how long that can of beans has been sitting in the back of your pantry, you have a way to find out.
But what, you might be asking about now, is a can code? Well, it’s a packing code used by the manufacturer for tracking purposes. That way they can more easily ensure their stock gets rotated and if there’s a recall it’s possible to know exactly what cans are involved.
The thing is, these codes aren’t meant to be used by the consumer. If you grab a can of corn out of your cupboard you’ll quickly see the code on the top or bottom. It might be printed on the lid, or stamped into the metal so that you’ll feel it more easily than see it. You’ll notice it doesn’t make much sense. To the manufacturer, however, it contains a lot of important information, everything from the date of the manufacture to where it was made.
The encoded dates represent the date the can was filled and processed. They’re not “use by” dates although they can be useful if you aren’t sure how old a particular can is.
By the Way: As a rule of thumb, acidic canned foods like pineapple and tomatoes can be stored 12 to 18 months. Low-acid foods, like meat, beans and most vegetables, can be stored much longer – 2 to 5 years. Do discard any can that is bulging or rusting, however, as the contents are almost sure to have gone bad. After all isn’t avoiding food poisoning worth $1.19?
While some manufacturers have switched to open dating, which is where they have a plainly understood date of manufacture on the can, those that still use closed dating can be wary of sharing that information. In looking around, however, I found that Walton Feed has a page of can-lid codes as well as one on the closed dating codes.
Water Bath Canning

Boiling Water Bath Canning Method
A boiling water canner is a large kettle with a lid and internal rack. It must be deep enough to allow jars to be covered with 1 to 2 inches of water and still have additional height for water to boil actively. The jars must be held off the bottom so the heat can penetrate properly. The jars are divided so they will not bump into each other or tip over in the boiling water. The jars should be covered by one (to two) inches of water when it is briskly boiling, so the heat thoroughly penetrates the food at the top of the jar. An additional one to two inches of air space should be allowed between the top of the boiling water and the top of the kettle (pot).
The boiling water bath canning method is recommended for canning high acid foods such as: fruits, tomatoes, (when an additional acid has been added) pickles, relishes, and other foods with vinegar added. This method is adequate to destroy molds, yeasts, enzymes, and some bacteria.
A fresh look is easy
Ascorbic acid helps prevent the discoloration of apples, apricots, peaches, pears, mushrooms and potatoes, and stem-end darkening of cherries and grapes. You can find ascorbic acid in several forms.
· Pure powdered ascorbic acid is available among canners' supplies in supermarkets during the canning season. One level teaspoon of pure powder weighs about three grams. Use one teaspoon per gallon of water as a treatment solution.
· Vitamin C tablets are economical and available year-round in many stores. Crush and dissolve six 500-milligram tablets in a gallon of water as a treatment solution.
· Commercially prepared mixtures of ascorbic and citric acid are available among canners' supplies in supermarkets. Follow the manufacturer's directions. Citric acid powder is often sold in supermarkets, but it is less effective in controlling darkening.
Hot-pack for canned foods that sizzle with taste
Home-canned food retains quality longer when air is removed from the food before jars are sealed. Hotpacking is the best way to remove air. It also "shrinks" food so that more will fit into each jar, helps keep the food from floating, increases vacuum in sealed jars and improves shelf life.
How to hot-pack

· Bring freshly prepared food to a boil and simmer two to five minutes. Loosely fill jars with the boiled food.
· Hot-packing is the preferred pack style for foods processed in a boiling-water canner. At first, the color of hot-packed foods may appear no better than that of raw-packed foods, but within a short storage period, both color and flavor of hot-packed foods will be superior.
· In raw-packing, jars are filled tightly with freshly prepared, unheated food. Some foods, especially fruit, will float in the jars. The trapped air may cause the fruit to discolor in as little as two to three months. Raw-packing is more suitable for vegetables processed in a pressure canner. With that being said, I cold pack mine.
· Whether food has been hot-packed or raw-packed, you should heat the juice, syrup or water added to the foods to boiling before adding it to the jars.
Headspace allows food to expand and forms a vacuum as jars cool.

The unfilled space in a jar between the food and the lid is called headspace. Leave one-fourth inch for jams and jellies, one-half inch for fruits and tomatoes to be processed in a boiling-water canner and from one inch to 1-1/4 inches in low-acid foods to be processed in a pressure canner. Headspace allows food to expand during processing and forms a vacuum as jars cool.

Mason jar with two-piece lid including a ring band and a metal flat with sealing compound.
Use the right jars and lids
Regular and wide-mouth, Mason-type, threaded jars with self-sealing lids are the best choice for home canning. They are available in one-half pint, pint, 1-1/2 pint, quart, and one-half gallon sizes. The regular jar mouth opening is about 2-3/8 inches. Wide-mouth jars have openings of about 3 inches, which makes them easier to fill and empty. Use half-gallon jars only for canning very acid juices. Jelly jars are available in eight-ounce and 12-ounce sizes.
With careful handling, Mason jars and screw bands may be reused many times. You will need to use new lids (flats) each time, however. After jars have cooled, remove screw bands. Wash and dry bands and store in a dry area. If left on stored jars, they become hard to remove and often rust, which makes them unsuitable for further use.
When you use jars and lids properly, the results are excellent seals and vacuums and little or no jar breakage.
You can use most commercial pint- and quart-size mayonnaise or salad dressing jars with new two-piece lids for canning acid foods in boiling-water canners. However, you should expect more seal failures and jar breakage. Don't use commercial jars in pressure canners — excessive breakage is a problem. Commercial jars with mouths that cannot be sealed with two- piece canning lids are not recommended for use in canning any food at home.
Show off canned foods with sparkling jars
Before every use, wash empty jars in hot water and detergent and rinse well by hand. Or, wash in a dishwasher. Unrinsed detergent may cause unnatural flavors and colors in home-canned food. Remove scale or hard-water film on jars by soaking jars several hours in a solution containing one cup of vinegar (5 percent acidity) per gallon of water. These washing methods do not sterilize jars.
Sterilizing jars
Sterilize jars to be used for jams, jellies and pickled products processed less than 10 minutes. Place empty jars right-side-up on the rack in a boiling-water canner. Fill the canner and jars with hot (not boiling) water to one inch above the tops of the jars. Boil 10 minutes at altitudes of less than 1,000 feet. If you live above 1,000 feet, boil for 11 minutes. Remove hot, sterilized jars one at a time and drain. Save the hot water for processing filled jars. Fill jars with food, adjust lids and process as directed.
Jars used for vegetables, meats and fruits to be processed in a pressure canner do not need to be sterilized. It is also unnecessary to sterilize jars for fruits, tomatoes and pickled or fermented foods that will be processed 10 minutes or longer in a boiling water canner.
Top it off with the right lid
The two-piece, self-sealing lid is recommended for home canning. It consists of a flat, metal lid held in place during processing by a metal screw band. The flat lid is crimped around the bottom edge to form a trough, which is filled with a colored gasket compound. When jars are processed, the lid gasket softens and flows slightly to cover the jar-sealing surface, yet allows air to escape from the jar. The gasket then forms an airtight seal as the jar cools. Gaskets in unused lids work well for at least five years from date of manufacture if stored in a cool, dry area. Older unused lids or improperly stored lids may fail to seal.
Buy only the quantity of lids you will use in a year. To ensure a good seal, carefully follow the manufacturer's directions in preparing lids for use. Examine all metal lids carefully. Do not use old, dented or deformed lids, or lids with gaps or other defects in the sealing gasket.
After filling jars with food, release air bubbles by inserting a flat, plastic spatula between the food and the jar. (Don't use a metal spatula or knife.) Slowly turn the jar and move the spatula up and down to allow air bubbles to escape. Adjust the headspace and clean the jar rim (sealing surface) with a clean, damp paper towel.
Place the lid, gasket down, onto the cleaned jar rim. Unclean jar-sealing surfaces may cause seal failures. Then fit the metal screw band over the flat lid. Follow the lid manufacturer's guidelines for tightening the jar lids properly.
Do not retighten lids after processing jars. As jars cool, the contents in the jar contract, pulling the self-sealing lid firmly against the jar to form a high vacuum. If screw bands are too loose, liquid may escape from jars during processing, and seals may fail. If screw bands are too tight, air cannot vent during processing, and food will discolor during storage. Over tightening may also cause lids to buckle and jars to break, especially with raw-packed, pressure-processed food.
Canners put the pressure on
There are two main types of canners for home canning: boiling-water canners and pressure canners. Most hold seven-quart jars or eight to nine pint jars. Small pressure canners hold four quart jars; some large pressure canners hold 18 pint jars in two layers, but only seven quart jars. Never use pressure saucepans with smaller-volume capacities for canning.
You must process low-acid foods, like vegetables, meat, poultry and fish, in a pressure canner to prevent botulism, an often fatal type of food borne illness. Although pressure canners may also be used for processing some acid foods, such as fruits, boiling water canners are recommended for this purpose because they are faster.
Boiling-water canners
Boiling-water canners are made of aluminum or porcelain-covered steel. They have removable, perforated racks and fitted lids. The canner must be deep enough so that at least one inch of briskly boiling water will cover the tops of jars during processing. Boiling-water canners with ridged bottoms can be used only on a gas range. Boiling-water canners with flat bottoms can be used on either a gas or electric range. To ensure uniform processing of all jars with an electric range, the canner should be no more than four inches wider than the burner (meaning that when centered over the burner, the canner would overhang the burner by two inches all the way around).
Boiling-water canning step-by-step
· Fill the canner halfway with water.
· Preheat water to 140 degrees Fahrenheit for raw-packed foods and to 180 degrees Fahrenheit for hot-packed foods.
· Load filled jars, fitted with lids, into the canner rack and use the handles to lower the rack into the water; or fill the canner, one jar at a time, with a jar lifter.
· Add more boiling water, if needed, so the water level is at least one inch above jar tops. Do not pour directly on jar tops.
· Turn heat to its highest position until water boils vigorously.
· Set a timer for the minutes required for processing the food. Be sure to use correct time for your altitude.
· Cover the canner and lower the heat setting to maintain a gentle boil throughout the process schedule.
· Add more boiling water, if needed, to keep the water level at least one inch above the jars.
· When jars have been processed for the recommended time, turn off the heat and remove the canner lid. Wait five minutes before removing the jars
· Use a jar lifter to remove the jars, and place them on a towel. Leave at least one inch of space between the jars during cooling.
Allow time for a slow cool-down
When removing hot jars from a canner, do not retighten their lids. Retightening of hot lids may cut through the gasket and cause seal failures. Cool the jars at room temperature for 12 hours to 24 hours on towels or racks. The food level and liquid volume of raw-packed jars will be noticeably lower after cooling. Air is exhausted during processing and food shrinks. If a jar loses excessive liquid during processing, do not open it to add more liquid.
Testing jar seals
After cooling jars for 12 hours to 24 hours, remove the screw bands and test seals using one of these methods:
· Press the middle of the lid. If it springs up when released, the lid is not sealed.
· Tap the lid with the bottom of a teaspoon. If the jar is sealed correctly, it will make a ringing, high-pitched sound. A dull sound means the lid is not sealed. Food touching the underside of the lid, however, will also cause a dull sound. Test seal by another method to make sure it is sealed.
· Hold the jar at eye level, and look across the lid. The lid should be concave (curved down slightly in the center). If the center of the lid is either flat or bulging, it may not be sealed.
Reprocessing unsealed jars
If a lid fails to seal, you must reprocess within 24 hours. Remove the lid, and check the jar-sealing surface for tiny nicks. If necessary, change the jar. Always use a new, properly prepared lid, and reprocess using the same processing time. The quality of reprocessed food is poor. Instead of reprocessing, unsealed jars of food can also be frozen if headspace is adjusted to 1-1/2 inches and food is in a freezer-safe container. Single, unsealed jars can be refrigerated and used within several days.
Storing canned foods
Tightly sealed, cooled jars are ready to be stored. Remove screw bands, wash the lid and jar to remove food residue, rinse and dry jars. Label and date jars, and store them in a clean, cool, dark, dry place — 50 degrees Fahrenheit to 70 degrees Fahrenheit is ideal. Do not store jars above 95 degrees Fahrenheit, or near hot pipes, a range, a furnace, in an uninsulated attic or in direct sunlight. Under conditions such as these, food will lose quality in a few weeks or months and may spoil. Dampness may corrode metal lids, break seals and allow recontamination and spoilage.
Freezing of canned foods will not cause spoilage unless jars become unsealed and recontaminated. Freezing and thawing will soften food, however. If you must store jars where they may freeze, wrap them in newspapers, place them in heavy cartons and cover with more newspapers and blankets.
PRESSURE CANNING

This seems to be intimitating for some people. Try it... it isn't that scarey.
The steam-pressure method is used for low-acid foods. Normally, the pressure given for low acid foods in canning guides is for weighted-gauge canners at altitudes at or below 1,000 feet above sea level. At altitudes of 1,001 feet of above, adjust the processing pressure according to the STEAM-PRESSURE CANNER chart for the type of steam-pressure canner being used.
USING PRESSURE CANNERS
WHY CHOOSE PRESSURE CANNING TO PRESERVE FOOD?
Pressure canning is a safe and economical method of preserving low acid foods which has been used for decades—especially by home gardeners and others interested in providing food storage for their families where quality control of the food is in ones’ own hands. Home food preservation also promotes a sense of personal satisfaction and accomplishment. Further, the guess-work is taken out of
being able to provide a safe food supply at home when guidelines for operating a pressure canner are followed exactly, scientifically tested/approved recipes are utilized, and high quality equipment, supplies and produce are used.
WHAT FOODS ARE TYPICALLY PROCESSED/PRESERVED USING A PRESSURE CANNER—AND WHY?

Low acid foods require a higher temperature when processing than can be reached by placing them in jars immersed by boiling water. To kill harmful bacteria (such as those associated with botulism) use of pressure canning ensures the safety of the preserved produce. Foods such as red meats, sea food, poultry, milk, and all fresh vegetables, with the exception of most tomatoes, fit into the low acid group since they have an acidity, or pH level, of 4.6 or higher. The temperature which must be reached and maintained (for a specified amount of time) to kill the bacteria is 240EF. This temperature can be reached only by creating steam under pressure.
BECOMING FAMILIAR WITH THE PARTS OF A PRESSURE CANNER
Older model pressure canners (made before 1970) were heavy-walled kettles with clamp-on or turn-on lids fitted with a dial-type gauges. A vent port, in the form of a petcock or counterweight, and a safety fuse were also present. Modern pressure canners are lightweight, thin-walled kettles and most have turn-on lids. They usually have a perforated metal rack or basket with handles, rubber gasket, a dial or weighted gauge, an automatic vent/cover lock, a vent port (steam vent) to be closed with a counterweight or weighted gauge, and a safety fuse.
Note: When purchasing a used pressure canner, make certain all parts are accounted for and in good condition. It is nearly impossible to find replacement parts for older models.
SELECTING THE CORRECT PROCESSING TIME AND PRESSURE
To ensure the safety of food processed in the pressure canner, use processing times listed for scientifically-tested recipes (dated 1988 or later) and adjust for altitude using the chart above. Keep in mind that failing to follow proper processing times and pressure recommendations may result in spoiled food (mold, bacteria, and other microorganisms) and possibly fatal food poisoning. Don't let this scare you...I 've been canning for years without a problem.
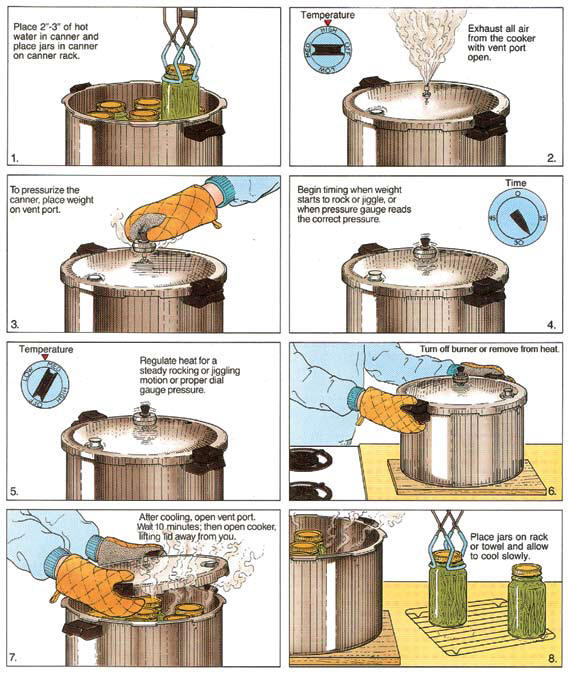
STEPS FOR SUCCESSFUL STEAM PRESSURE
1. Put 2 –3 inches of hot water in canner. Place filled jars on the rack, using a jar lifter. Fasten canner lid securely.
2. Leave weight off vent port or open petcock. Heat at the highest setting until steam flows from the petcock or vent port.
3. Maintain high heat setting, exhaust steam 10 minutes, and then place weight on vent port or close petcock. The canner will pressurize during the next 3 to 5 minutes.
4. Start timing the process when the pressure reading on the dial gauge indicates that the recommended pressure has been reached, or when the weighted gauge begins to jiggle/ rock.
5. Regulate heat under the canner to maintain a steady pressure at or slightly above the correct gauge pressure. If the pressure reading goes below the recommended pressure, you must bring the pressure back up and start the timing process over again from the beginning.
6. When timed processing is completed, turn off the heat, remove canner from heat (if electric range), and let the canner “depressurize” at room temperature (dial needle moves back to “0" or no steam sounds when weight is gently nudged). Do not force-cool the canner. Releasing pressure from a partially opened vent or placing the canner under cool water will result in under-processing. It may also cause unsealed jars and loss of liquid from the jars. Quick-cooling can also warp the canner lid of older model canners.
7. After the canner is depressurized, remove the weight from the vent port or open the petcock. Wait 2 minutes, unfasten the lid, and remove it carefully. Lift the lid away from you so that the steam does not burn your face.
8. Remove jars with a lifter, and place on towel or cooling rack, if desired. Do not set on a cold surface or expose to breezy conditions.
For those of you that prefer pictures:
ADDITIONAL SAFETY/OPERATING TIPS
Gauges: Check dial gauges for accuracy before use each year and replace if they read high by more than 1-2 pound pressure. Gauges may be checked at most county Cooperative Extension offices. Replacement gauges and other parts for canners are often available at stores offering canning equipment or from canner manufacturers. When ordering parts, it will be helpful to know the model number of your canner.
Gaskets: Handle canner lid gaskets carefully and clean them according to the manufacturer’s directions. Nicked or dried gaskets will allow steam leaks during pressurization of canners and should be replaced. Keep gaskets clean between uses. A lid which is difficult to remove after cooling may indicate a gummy, or dry gasket and is reason to replace it.
Sources: Adapted from information in the USDA Complete Guide to Home Canning and Ball Blue Book, Guide to Home Canning, Freezing & Dehydration.

There are many books available to help or call me for help.
No comments:
Post a Comment